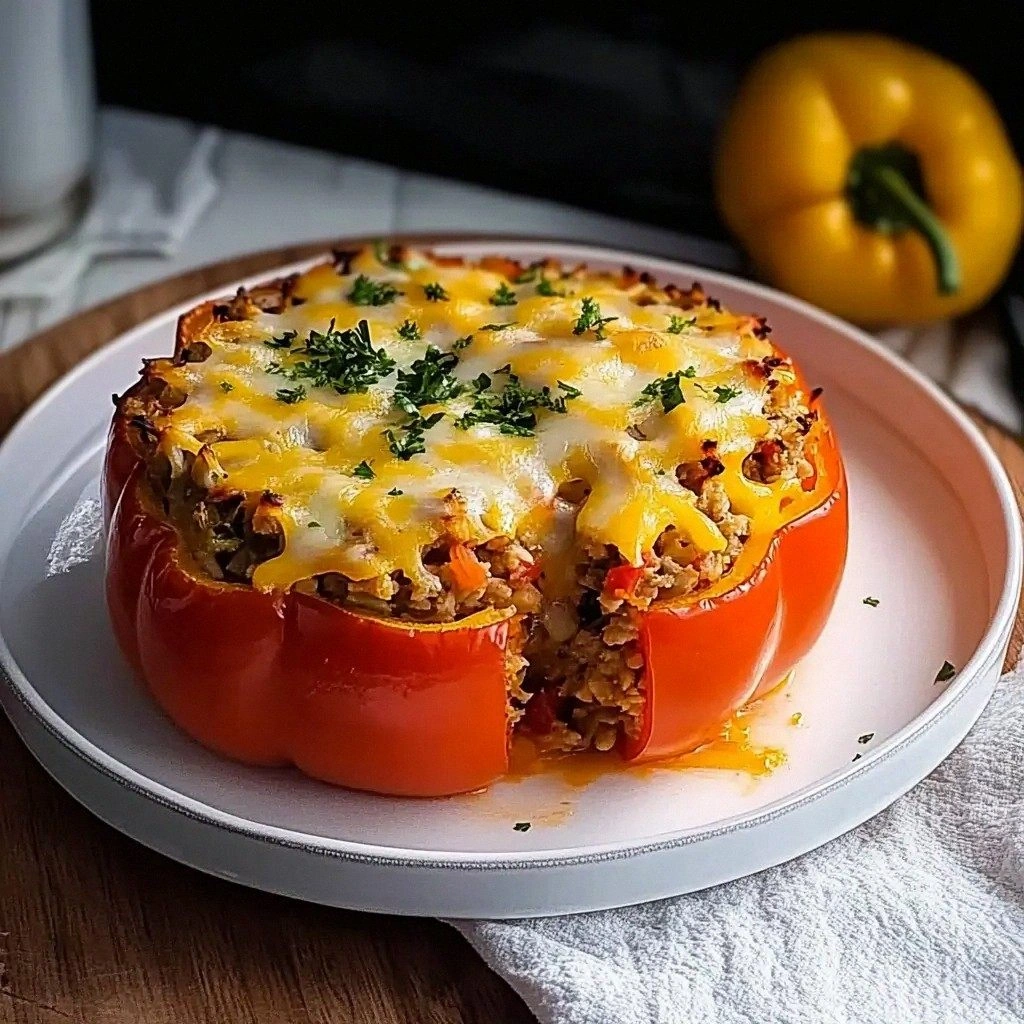
Inside-Out Stuffed Peppers Rec
Picture this: a kitchen full of chatter, a pot simmering on the stove, and the sudden realization that the bell peppers you bought last week are about to turn into the star of the dinner. I was in a frantic rush to feed a group of friends, and the last thing I wanted was a bland, overcooked pepper. That night, I pulled out a handful of ground turkey, a splash of tomato sauce, and a secret technique that turned ordinary stuffed peppers into a show‑stopper. I swear, the aroma that filled the air was like a warm hug from an old friend, and the colors on the plate were so vibrant they practically shouted, “Eat me!”
When I first tossed the peppers into the oven, I could hear the gentle hiss of the sauce bubbling, and I could almost taste the tang of the tomatoes mingling with the savory meat. The crunch of fresh peppers met the melt of cheese in a symphony of textures that made my mouth water. The first bite was a burst of flavor that left a lingering savory aftertaste, while the second hit the palate with a comforting softness that felt like a hug. I could not stop myself from taking a second bite, and I am not ashamed to admit that I ate half the batch before anyone else even had a chance to taste.
What sets this version apart from every other stuffed pepper recipe you’ve tried is the way it flips the classic concept on its head—literally. Instead of stuffing the pepper’s cavity, we hollow out the pepper’s flesh, create a pocket inside, and fill it with a luscious mixture that coats every inch. The result is a pepper that looks like it was carved by a chef, with a juicy, flavorful center that keeps the exterior crisp and the interior moist. If you’ve ever struggled with soggy peppers or uneven cooking, you’re not alone—and I’ve got the fix.
And here’s the kicker: I’m going to show you a technique that involves a quick sear and a special sauce that you’ll never see in a standard recipe. This is hands down the best version you’ll ever make at home, and I dare you to taste it and not go back for seconds. Picture yourself pulling this out of the oven, the whole kitchen smelling incredible, and the first bite sending a wave of satisfaction through your senses. Let me walk you through every single step — by the end, you’ll wonder how you ever made it any other way.
What Makes This Version Stand Out
- Texture: The inside-out construction creates a crisp exterior that gives way to a tender, juicy interior. The pepper’s skin acts like a natural foil, locking in moisture and flavor while the interior remains airy and light. The result is a bite that delivers a satisfying crunch followed by a melt‑in‑your‑mouth experience.
- Flavor Depth: The combination of sautéed onions, garlic, and a rich tomato‑basil reduction infuses every layer with a savory, slightly sweet profile. The cheese layer adds a creamy, slightly salty finish that balances the acidity of the tomatoes, creating a complex flavor that lingers on the tongue.
- Ease of Prep: With a single pan sauté and a quick oven bake, this recipe keeps the cleanup minimal. The steps are straightforward, and the ingredients are pantry staples, so you can whip up a crowd‑pleaser in less than an hour.
- Versatility: Swap the meat for a plant‑based crumbled tofu or tempeh, or change the cheese to a dairy‑free alternative. The base of the recipe adapts to dietary preferences without sacrificing taste.
- Make‑Ahead Friendly: Assemble the peppers, refrigerate them, and bake them later. The flavors actually deepen when you let the peppers rest, making this a great option for busy weeknights.
- Visual Appeal: The inside-out design gives the dish an almost sculptural look. When you slice into the pepper, the vibrant colors of the filling burst out, making the dish Instagram‑ready.
Alright, let’s break down exactly what goes into this masterpiece…
Inside the Ingredient List
The Flavor Base
At the heart of this dish lies a simple yet powerful flavor base that starts with sautéed onions and garlic. The onions caramelize to bring out a natural sweetness, while the garlic adds a punch of aromatic depth. When you combine them with a splash of tomato sauce, you’re setting the stage for a savory, slightly acidic undertone that will permeate the entire pepper. If you skip the onions, the dish will feel flat, lacking the complex sweetness that balances the meat’s richness.
Another key player is the tomato sauce, which serves as the primary liquid component. It not only adds moisture but also infuses the filling with a bright, tangy flavor. Using a high‑quality sauce with minimal additives ensures that the pepper’s interior remains flavorful and not overly watery. If you’re short on time, a canned sauce works fine, but fresh tomatoes or a homemade puree will elevate the taste significantly.
The Texture Crew
Ground turkey or beef provides the protein backbone. The choice between turkey and beef can shift the flavor profile; turkey is leaner and milder, while beef adds a richer, deeper taste. The meat should be browned to lock in juices and develop a caramelized crust that adds a subtle crunch to each bite. If you’re aiming for a vegetarian version, crumbled tofu or tempeh can substitute, offering a similar texture with a different flavor.
Cooked rice or quinoa acts as the binder that keeps the filling together. The grains absorb the sauce and distribute heat evenly, preventing the filling from drying out. If you prefer a lighter texture, try using cauliflower rice, which adds volume without the heaviness of traditional grains. Skipping the grains will make the filling loose and less cohesive.
The Unexpected Star
Breadcrumbs and Parmesan create a golden crust on the exterior when baked. The breadcrumbs absorb the residual sauce, forming a crisp, flavorful coating that contrasts beautifully with the soft interior. Parmesan adds a sharp, nutty finish that cuts through the richness of the cheese. If you’re gluten‑free, use gluten‑free breadcrumbs; if you’re vegan, opt for nutritional yeast as a cheese substitute.
Fun Fact: Breadcrumbs were originally invented in Italy as a way to salvage stale bread. They were then used in countless dishes, from meatballs to stuffed vegetables, and today they’re a staple in kitchens worldwide. Their ability to absorb liquids and create a crisp texture makes them indispensable in stuffed pepper recipes.
Everything's prepped? Good. Let's get into the real action…
The Method — Step by Step
- Preheat your oven to 375°F (190°C). While the oven warms, wash the peppers thoroughly, slice off the tops, and gently scoop out the seeds and membranes. The goal is to create a hollow space that will hold the filling without breaking the pepper’s skin. Keep the tops aside for later use as a lid.
- In a large skillet over medium heat, add a tablespoon of olive oil and sauté the diced onions until translucent, about 3-4 minutes. The onions should soften but not brown, preserving their natural sweetness. This step builds the aromatic base that will permeate the entire dish.
- Introduce the minced garlic to the skillet, cooking for an additional 30 seconds until fragrant. Be careful not to burn the garlic, as it will turn bitter and ruin the flavor profile. The aroma of garlic should fill the kitchen, signaling that you’re on the right track.
- Now add the ground turkey (or your chosen protein) to the skillet. Break it up with a wooden spoon and cook until browned, about 5-7 minutes. The meat should develop a slight crust, which adds depth and texture to the filling. If you notice excess fat, drain it to keep the dish lean.
- Stir in the cooked rice or quinoa, tomato sauce, dried oregano, basil, salt, and pepper. Mix until everything is well combined and the mixture is heated through. The sauce should coat the grains and meat, creating a cohesive filling that will stay together when stuffed.
- Fold in half a cup of shredded mozzarella (or your cheese of choice) and a quarter cup of grated Parmesan. The cheese melts into the filling, creating a creamy, gooey texture that will set into a golden crust during baking.
- Gently spoon the filling into each hollowed pepper, packing it lightly but not overfilling. The goal is to allow the filling to rise slightly during baking without spilling over. Place the pepper tops back on as a lid to keep moisture inside.
- Transfer the stuffed peppers to a baking dish. Sprinkle a thin layer of breadcrumbs over the tops, then dot with a few extra squares of cheese. Bake in the preheated oven for 25-30 minutes, or until the peppers are tender and the cheese is bubbling and golden. The peppers should look slightly blistered, indicating that the exterior has crisped up while the interior remains moist.
- Remove the peppers from the oven and let them cool slightly before serving. The steam inside will intensify the flavors, and a gentle squeeze of fresh lemon juice over the top can brighten the dish.
- Serve the peppers on a platter with a side of crusty bread or a simple green salad. The contrasting textures and flavors will make the meal feel complete.
- Optional: Garnish with chopped parsley or basil for a burst of color and fresh aroma. This final touch elevates the dish from simple to spectacular.
That's it — you did it. But hold on, I've got a few more tricks that'll take this to another level…
Insider Tricks for Flawless Results
The Temperature Rule Nobody Follows
Many chefs bake stuffed peppers at a high temperature for a short time, resulting in a dry interior. The trick is to bake at a moderate 375°F (190°C) for 25-30 minutes, then finish at 400°F (204°C) for the last 5 minutes to crisp the top. This two‑stage method ensures the inside stays moist while the exterior develops a golden crust.
Why Your Nose Knows Best
Before you open the oven door, take a deep sniff. The aroma of tomato and cheese will tell you if the peppers are done. If you smell a subtle, buttery scent, it means the cheese has melted perfectly. If you detect a burnt smell, the peppers are overcooked and the interior may be dry.
The 5-Minute Rest That Changes Everything
Letting the peppers rest for 5 minutes after baking allows the filling to set. This step prevents the liquid from spilling out when you cut the first slice. It also lets the flavors meld, giving you a more cohesive taste experience.
Cheese Selection Matters
Using a combination of mozzarella for meltiness and Parmesan for a sharp finish creates a balanced cheese profile. Avoid using only one type of cheese; the mixture prevents a greasy texture and adds depth.
Stirring the Filling Before Basting
Stir the filling once more before placing the peppers in the oven. This ensures the sauce is evenly distributed, preventing pockets of dryness or excess moisture.
Creative Twists and Variations
This recipe is a playground. Here are some of my favorite ways to switch things up:
Mexican Fiesta
Swap the mozzarella for a blend of cheddar and pepper jack, and add a splash of salsa verde to the filling. Serve with a dollop of sour cream and a sprinkle of fresh cilantro for a vibrant, spicy twist that will have guests begging for more.
Herb‑Infused Mediterranean
Replace the oregano and basil with a mix of dill, thyme, and oregano. Add diced sun‑dried tomatoes to the filling for an earthy, sweet burst. Finish with a drizzle of extra‑virgin olive oil and a squeeze of lemon to brighten the dish.
Vegetarian Delight
Use crumbled tofu or tempeh instead of ground meat, and add chopped spinach or kale to the filling for extra nutrition. Substitute mozzarella with a dairy‑free cheese blend to keep the dish plant‑based.
Spicy Cajun
Introduce a pinch of cayenne pepper and a tablespoon of Cajun seasoning to the meat mixture. Add diced bell peppers of varying colors for a visual pop, and serve with a side of cornbread to soak up the flavorful juices.
Cheesy Gnocchi Surprise
Incorporate cooked gnocchi into the filling for a comforting, Italian twist. The gnocchi absorbs the sauce and adds a pillowy texture that pairs wonderfully with the pepper’s crunch.
Storing and Bringing It Back to Life
Fridge Storage
Store any leftovers in an airtight container in the refrigerator for up to 3 days. The peppers will stay firm, and the flavors will continue to develop. When ready to eat, reheat in a preheated oven at 350°F (175°C) for 10 minutes, or until warmed through.
Freezer Friendly
Wrap each stuffed pepper individually in foil and place them in a freezer bag. They can be stored for up to 2 months. Thaw overnight in the refrigerator before reheating as described above.
Best Reheating Method
To keep the peppers moist, add a splash of water or broth to the bottom of a baking dish before reheating. Cover with foil to trap steam, then bake at 350°F (175°C) until heated through. This technique prevents the filling from drying out.