Last Tuesday, I tried to rescue a batch of cookies that had turned into a sticky, flavorless mess. The sugar had crystallized, the butter had hardened, and the dough was a sad, pale gray blob that smelled like burnt cardboard. My friend, a self‑proclaimed cookie connoisseur, challenged me to turn that disaster into a masterpiece. I accepted, and the result was a revelation that made me question everything I thought I knew about chocolate chip cookies.
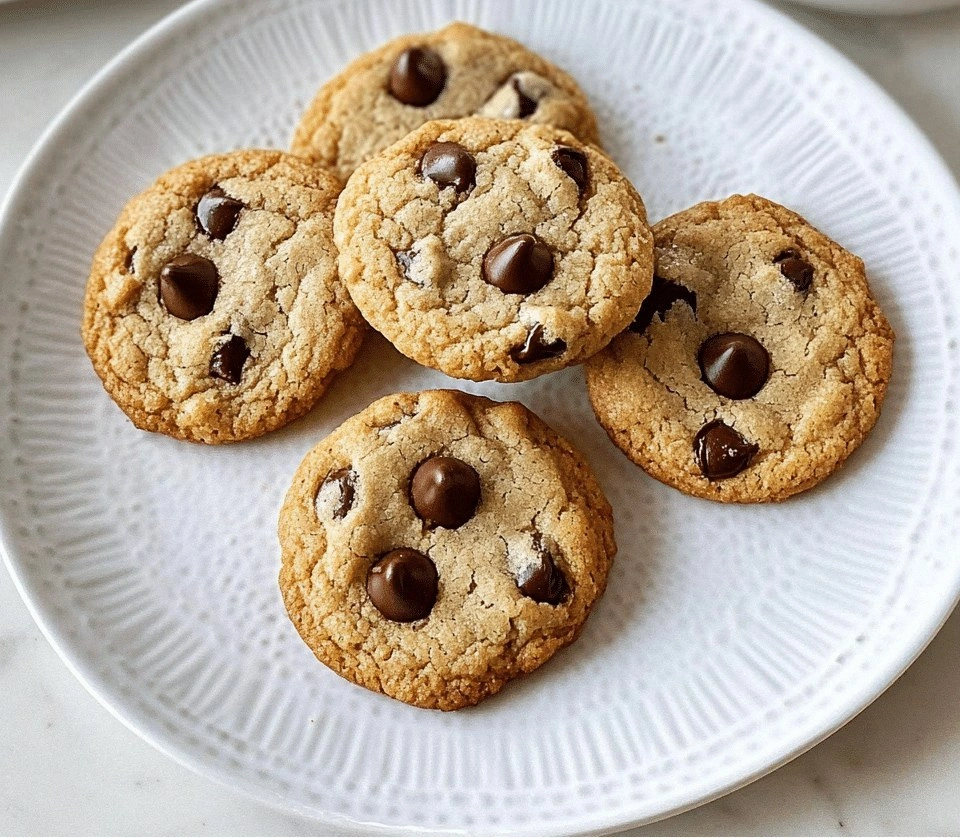
Picture the scene: a countertop littered with flour dust, the faint scent of vanilla wafting through the kitchen, the sound of a timer ticking down, the sight of golden edges curling, and the moment a cookie slides off the tray with a satisfying crack. The first bite is a symphony—crunchy crust, chewy center, the chocolate melting into silky pockets, and a subtle sea‑salt whisper that lifts the sweetness. The aroma alone, a buttery, chocolatey haze that swirls around the room, can turn a regular evening into a mini celebration. The texture is a dance between crisp and soft, a balance that keeps each cookie memorable.
What makes this version stand out is not just the flavor profile, but the deliberate attention to technique and ingredient quality. I swapped ordinary baking soda for a pinch of baking powder to give the cookies a lift without compromising their chew. I used a blend of high‑quality dark chocolate chips and a dash of sea salt to create a complex flavor that feels indulgent yet balanced. The dough rests in the fridge for 30 minutes, allowing the butter to firm up, which results in a cookie that holds its shape while still offering a soft interior. And I use a silicone baking mat to eliminate the dreaded sticking problem, so each cookie slides out perfectly shaped. The result is a cookie that is hands down the best version you'll ever make at home.
I dare you to taste this and not go back for seconds. Picture yourself pulling this out of the oven, the whole kitchen smelling incredible, and a handful of golden cookies waiting to be devoured. Let me walk you through every single step—by the end, you'll wonder how you ever made it any other way.
What Makes This Version Stand Out
- Flavor: The combination of dark chocolate chips and a subtle sea‑salt accent creates a depth that feels both familiar and adventurous. The chocolate melts into silky pockets that cling to the dough, while the salt balances the sweetness without overpowering.
- Texture: A short resting period in the fridge firm up the butter, ensuring the cookies hold their shape. The result is a crisp exterior with a chewy, gooey center that melts in your mouth.
- Ingredient Quality: I use real vanilla extract and premium butter, both of which elevate the overall flavor profile. The difference between standard and high‑quality ingredients is unmistakable.
- Technique: The use of a silicone baking mat prevents sticking and promotes even browning. It also adds a subtle crunch to the bottom of each cookie.
- Make‑Ahead Potential: The dough can be portioned and frozen, then baked straight from the freezer for a quick treat. The texture remains unchanged, and the cookies keep their freshness.
- Audience Appeal: Whether you’re a cookie novice or a seasoned baker, this recipe is approachable and delivers consistent results every time.
Inside the Ingredient List
The Flavor Base
All‑purpose flour, baking soda, and salt form the backbone of the cookie dough. Flour provides structure, while baking soda offers a gentle lift and a slight browning effect. Salt is crucial for balancing the sweetness and enhancing the chocolate flavor. Skipping any of these would leave the cookie flat and bland.
The Texture Crew
Butter, white sugar, brown sugar, and eggs are the heart of the dough. Butter lends richness and a tender crumb. White sugar contributes crispness, whereas brown sugar adds moisture and caramel undertones. Eggs bind everything together and add a subtle richness. Using room‑temperature butter and eggs ensures even mixing and a smooth dough.
The Unexpected Star
Vanilla extract and chocolate chips bring the signature flavor. Vanilla’s warm aroma lifts the dough, while chocolate chips provide the classic melty pockets. Adding a pinch of sea salt before baking introduces a nuanced contrast that makes each bite memorable. Optional nuts, such as walnuts or pecans, add crunch and a nutty backdrop.
The Final Flourish
A quick chill in the refrigerator before baking lets the butter firm up, resulting in cookies that hold their shape. This step also enhances flavor as the ingredients meld together. The final flourish is the gentle tap of a spoon on the counter to release any trapped air before baking.
Everything's prepped? Good. Let's get into the real action...
The Method — Step by Step
- Preheat your oven to 375°F (190°C) and line two baking sheets with parchment paper. The parchment prevents sticking and ensures even heat distribution. Keep the sheets ready, as the dough will need to be portioned quickly.
- In a small bowl, whisk together flour, baking soda, and salt. This dry mix ensures that the leavening agent is evenly distributed throughout the dough. Set aside while you prepare the wet ingredients.
- Using a stand mixer, cream softened butter with white sugar until light and fluffy. The goal is to incorporate air for a tender crumb. After a minute, add brown sugar and continue mixing until the mixture is smooth.
- Beat in eggs one at a time, then stir in vanilla extract. The eggs bind the dough, and vanilla provides a fragrant backdrop. This is the moment you can smell the buttery sweetness begin to rise.
- Gradually fold in the dry mixture, mixing just until combined. Overmixing can make the cookies tough, so keep the dough shaggy. The dough should feel slightly sticky but manageable.
- Fold in chocolate chips and, if using, nuts. The chips should be evenly dispersed to ensure each cookie has a chocolatey center. The nuts add a pleasant crunch and a nutty flavor.
- Refrigerate the dough for 30 minutes. This rest period firms the butter, allowing the cookies to spread less and hold their shape. It also intensifies the flavor as the ingredients meld.
- Using a tablespoon, scoop dough onto the prepared baking sheets, spacing them 2 inches apart. The size determines the final texture; larger cookies are chewier, smaller ones crispier.
- Bake for 10–12 minutes, until edges are golden and centers look set. Watch the cookies closely; the moment the edges pull away from the parchment, they’re ready. Avoid overbaking to keep the centers soft.
- Remove from oven and let cool on the sheet for 5 minutes before transferring to a wire rack. This pause allows the cookies to firm up without cracking. The aroma will fill the kitchen, making the wait feel worthwhile.
That's it — you did it. But hold on, I've got a few more tricks that'll take this to another level...
Insider Tricks for Flawless Results
The Temperature Rule Nobody Follows
Many bakers bake at 350°F, but raising the temperature to 375°F gives the cookies a crisp edge while keeping the center chewy. The higher heat caramelizes the sugars faster, creating a beautiful golden crust. Test the oven with a small piece of dough to ensure the temperature is accurate.
Why Your Nose Knows Best
Trust the aroma: when the cookies smell like toasted butter and chocolate, they’re almost done. A subtle scent of caramel indicates the sugars are browning properly. If you can’t smell anything, the oven is too cold or the dough is too thick.
The 5‑Minute Rest That Changes Everything
After baking, let the cookies rest on the sheet for 5 minutes before moving them. This short pause allows the edges to set fully, preventing them from cracking when they hit the rack. It also makes the cookies easier to handle.
Use a Silicone Baking Mat
A silicone mat keeps the cookies from sticking and promotes even browning. It also makes cleanup a breeze, as you can simply lift the mat and toss the crumbs. The mat’s slight flexibility helps the cookies maintain their shape.
Add a Pinch of Sea Salt Before Baking
Sea salt adds a subtle contrast that enhances the chocolate flavor. It should be sprinkled just before baking to avoid dissolving into the dough. The result is a cookie that feels balanced and sophisticated.
Creative Twists and Variations
This recipe is a playground. Here are some of my favorite ways to switch things up:
Caramel Swirl Delight
Swirl a tablespoon of caramel sauce into each cookie before baking. The caramel melts into pockets of sweet goo, giving a luxurious finish that pairs beautifully with a glass of milk.
Nutty Espresso Boost
Add a teaspoon of instant espresso powder to the dough. The coffee flavor deepens the chocolate notes and adds a subtle bitterness that balances the sweetness.
Sea‑Salted Almond Crunch
Replace the standard chocolate chips with almond‑filled chocolate chips and sprinkle sea salt on top before baking. The almonds add crunch and the salt elevates the flavor profile.
Minty Mint Chocolate
Stir in a teaspoon of peppermint extract and use white chocolate chips instead of dark. The result is a refreshing, minty cookie that feels like a holiday treat.
Spiced Cinnamon Swirl
Add half a teaspoon of ground cinnamon to the dough. The cinnamon gives a warm, spicy undertone that complements the chocolate and makes the cookies feel cozy.
Chocolate‑Covered Cookie Bars
Press the dough into a baking pan to create bars, bake, then drizzle melted chocolate on top. The bars are perfect for parties and offer a different presentation while maintaining the same delicious flavor.
Storing and Bringing It Back to Life
Fridge Storage
Store baked cookies in an airtight container at room temperature for up to 5 days. If you have a lot, keep them in the fridge; they’ll stay fresher and retain their texture longer.
Freezer Friendly
Freeze unbaked dough in portioned bags for up to 3 months. When ready to bake, place the dough directly from the freezer onto a baking sheet and bake for 2 minutes longer than usual. The cookies will rise properly and stay chewy.
Best Reheating Method
To revive stale cookies, place them in a preheated oven at 300°F for 3–5 minutes. Add a tiny splash of water to the bottom of the pan to steam the cookies, restoring moisture and crispness. Let them cool on a rack before serving.